If your harvi device has developed a fault and needs replacing, this guide will walk you through the process of removing the faulty harvi, installing the new one, pairing it with your Zappi or Eddi, and restoring the previous settings. Follow the steps below to ensure a seamless replacement and reconfiguration.
Removing the Faulty Device
-
Locate the Retaining Clips:
At the top and bottom of the harvi's front cover, locate the two white plastic retaining clips.
-
Release the Front Cover:
Push these clips inward to release the harvi's front from the rear casing.
-
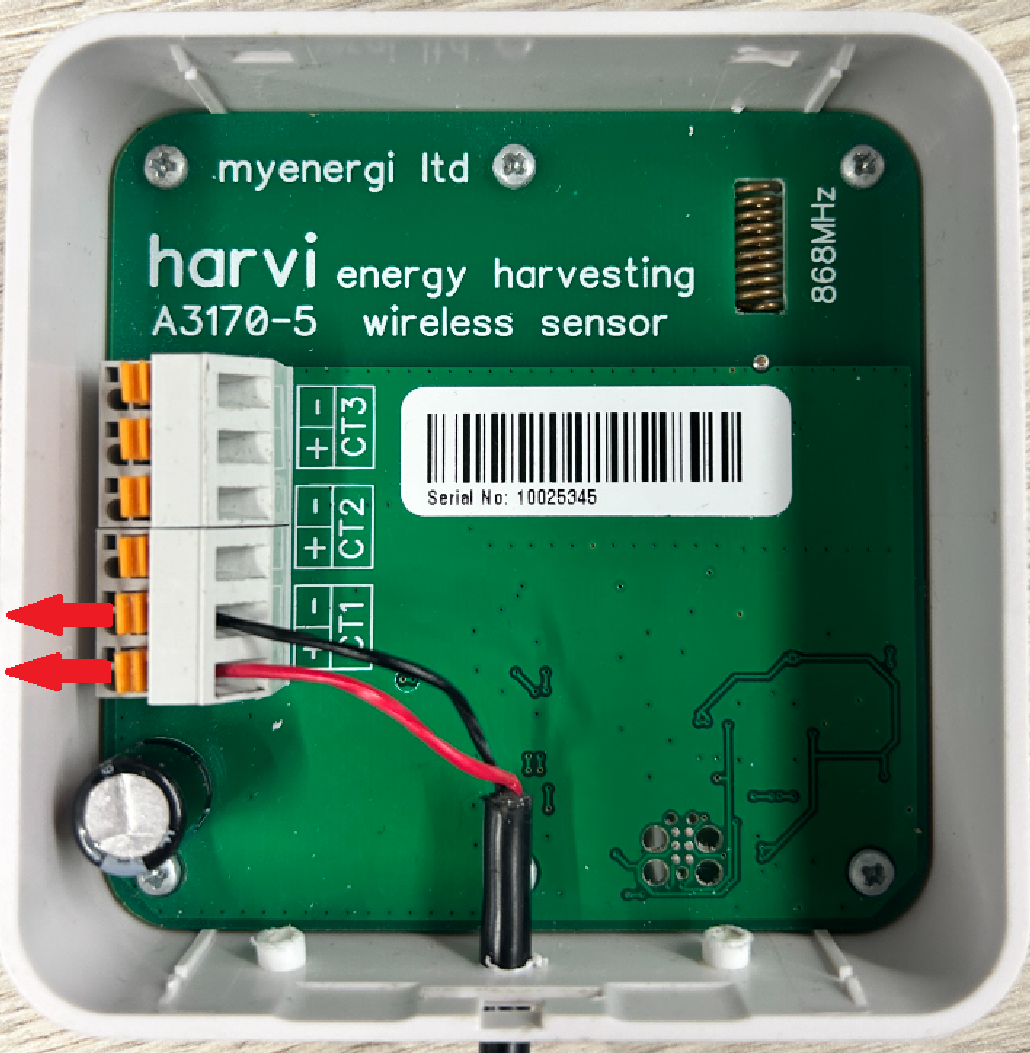
Disconnect the CT Wires:
Once the front cover is detached, you will see the CT wire connected to a CT port inside the harvi. Identify the orange levers and pull them back to release the CT cable from the device.
|
 |
|
Installing the New harvi
-
Insert the CT Wires into the New harvi:
Place the CT wires into the new harvi, ensuring they are positioned in the same slots as the faulty device.
-
Allow the harvi to Initialize:
After connecting the wires, allow the harvi to initialize for approximately 30 to 50 seconds.
-
Observe the LED Indicator:
The LED on the harvi will begin to flash green, indicating that the device is operational.
-
Connect the harvi to Your Zappi or Eddi:
The harvi is now ready to be paired with your Zappi or Eddi for functionality.
|
Removing the Old harvi from the Main Device
-
Access the Main Device Menu:
Go to the menu on your Zappi or Eddi and navigate to:
Menu > Other Settings > Installer Settings > 0000 > Linked Devices > Devices > Harvi > Remove Device.
-
Note the CT Settings:
Before proceeding, make sure to note down each CT’s settings so that you can restore them later.
|
Pairing the New harvi
-
Activate Pairing Mode on the harvi:
Press the pair button on the harvi for one second. Count the number of blue flashes—each flash corresponds to a channel. Use channel 1 unless otherwise specified.
-
Go to the Main Device Pairing Menu:
On your Zappi or Eddi, navigate to:
Menu > Other Settings > Installer Settings > 0000 > Linked Devices > Pairing Mode.
-
Confirm Pairing on the Main Device:
Once the harvi appears in the device list, press the tick or plus button on the main device to confirm the pairing.
-
Wait for Confirmation:
Wait for the timer to reach zero and the question mark to disappear. This indicates that pairing has been successful.
|
Restoring Previous Settings
-
Reapply the CT Settings:
Using the settings you noted earlier, adjust the CT settings on the new harvi. Press the plus or tick button on the harvi to confirm each adjustment.
-
Confirm Functionality:
After the new harvi is installed and settings have been restored, verify that the device is working correctly. Contact our support team to confirm successful installation and that readings are being transmitted accurately.
|
Following these steps will ensure a smooth transition when replacing and pairing a new harvi with your zappi or eddi. If you encounter any issues or need assistance, feel free to contact the myenergi Support Team for further guidance.